
Template Editor
Introduction
For Video help about the Template Editor, please click here
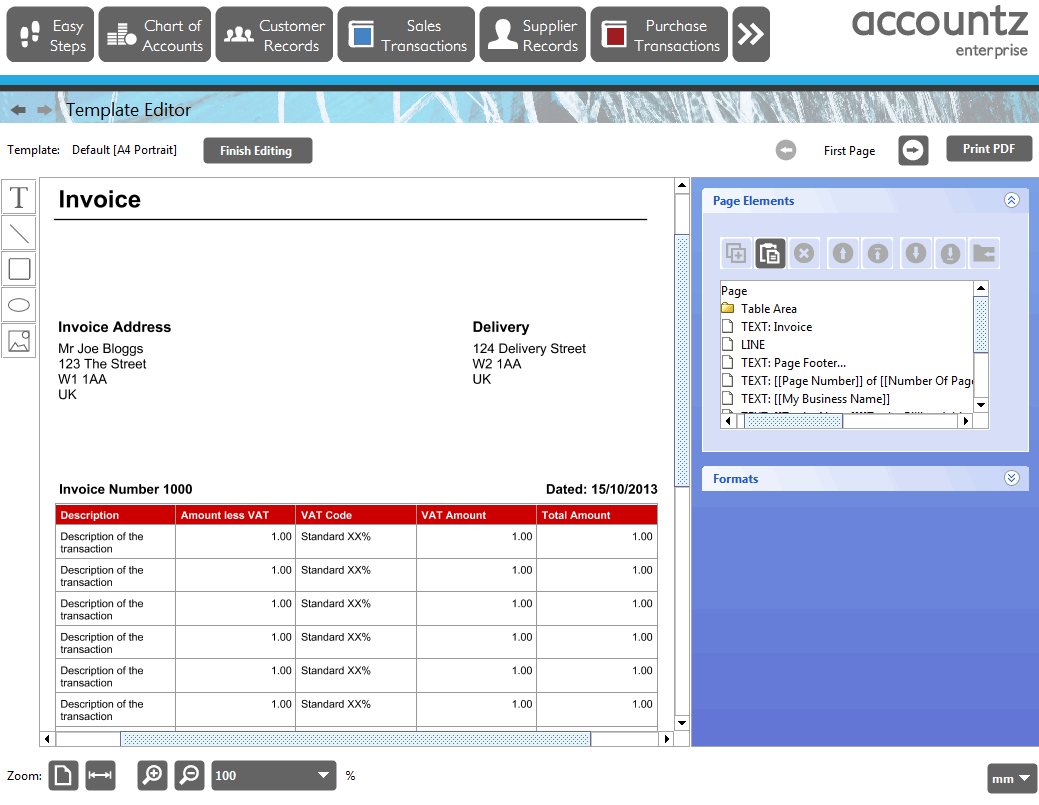
The Template Editor enables the user to edit individual document templates.
It is launched whenever you select the Edit or Copy option within Documents>Templates, or the 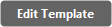 Edit Template Button within the Document Editor itself.
For users wishing to make universal changes to all their templates, please see the Templates Builder component.
There are five options available to facilitate this.
- Canvas editing - there are a number of keyboard/mouse options for editing the canvas area directly.
- The left hand toolbar enables the user to add text, lines, shapes and images.
- The right hand properties panel enables the user to edit the attributes of the elements which make up the template.
- The top toolbar enables the user to select different pages within the template (where applicable), export the template to PDF (for print previewing), and finish editing the template.
- The bottom toolbar enables the user to resize the template for previewing purposes.
Canvas
The user can click on the canvas area to select the various different elements which comprise the template. Clicking on an element will select it in the Page Elements panel below, and display its editable properties accordingly.
There are a number of options available for editing the visible elements on the canvas:
N.B. Mac users - for the following, please read ‘CTRL’ as ‘CMD’.
- Click/Drag to select/move - Clicking and Dragging enables the user to select items, and (move) drag and drop the item once selected
- CTRL/Click/Drag - When a screen element is already selected, holding the CTRL button (CMD for Mac) whilst clicking and dragging enables the user to select and group more than one element simultaneously
- CTRL/Click - Pressing CTRL (CMD for Mac)/Clicking enables the user to select more than one screen element simultaneously
- Shift + Arrow Key - Enables the user to move the selected screen elements
- CTRL + C - Enables the user to copy the selected element
- CTRL + V - Enables the user to paste the copied element (please note, copied items can be pasted into different templates).
- Resize - a selected element can be resize by pulling on its drag handles
- Delete - Clicking the delete key deletes the selected element
Right Clicking (CTRL/Click for Mac) a selected screen element launches a menu offering the following options, as per the Page Elements section above:
 Move to front - moves the selected element to the front
 Move forwards - moves the selected element forwards
 Move backwards - moves the selected element backwards
 Move to back - moves the selected element to the back
 Move In/Out of table area - moves the selected element in/out of the transaction table
 Copy Selected elements - copies the selected element(s)
 Delete - deletes the selected element
Left Toolbar
This comprises the following tools:
 Text tool
 Line tool
 Square tool
 Ellipse tool
 Image tool
These tools enable you to add new items to the template.
Text tool
The Text tool enables the user to add a text field to the template. Click the Text tool icon, then click where you would like to place the new field on the template. A box will appear prompting you to enter the desired text. It will also ask if you wish to add any dynamic fields (such as date or page number). The Text Field’s size can be adjusted by clicking on the field to select it then dragging the handles to resize it. The Text Field can be further adjusted using the Position, Text and Format options in the Right Toolbar (described below).
Line tool
The Line tool enables the user to draw lines on the template. Click and hold where you want the line to start then move the mouse to the point where you want the line to end. The user can drag and drop the line to move it, or stretch/shrink it using the drag handles. The line’s attributes can be further adjusted via the Position and Line options in the Right Toolbar (described below).
Square tool
The Square tool enables the user to create a square/rectangle on the template. Click and hold the mouse where you want the square/rectangle to start. Drag the mouse to set the size of the square/rectangle. This items’ attributes can be further adjusted using Position, Line and Fill options in the Right Toolbar.
Ellipse tool
The Ellipse tool enables the user to create Curved shapes on the template. Click and hold the mouse on the template to place the shape, and drag to determine size. The item can be further manipulated by dragging/dropping with the mouse, and via the Position, Line and Fill options available in the Right Toolbar.
Image tool
The Image tool enables the user to place an image file into the template. Click the Image tool icon and then click where you would like to place the image file on the template. This will launch a dialogue box prompting you to select an already imported image, or to import a new one. Once the Image has been placed on the template, it can be moved/resized by dragging it with the mouse, and adjusted using the Position, Image and Format options available via the Right Toolbar.
Right-hand Properties Panel
The panel on the right of the screen enables the user to edit the attributes of the elements which make up the template. It displays a changing list of ‘property boxes’ depending on the Page Element currently selected (either via the Page Elements panel below, or by clicking on an element in the design window).
The Properties Panel offers the following options:
Page Elements
[Accounting Software screenshot property page elements] (images/screenshot_property_page_elements.gif)
The Page Elements component details a list of all elements contained within a document template. It enables the user to select elements and re-order/edit them as required.
The element at the top of the list is displayed frontmost on the template and the element at the bottom rearmost. To move an element within the list/template use the arrow icons above the table (see below). To delete the element press the Delete button.
The list contains the following folders:
- Page – this folder comprises everything within the template
- Table Area – this folder comprises everything contained within the Transaction Table part of the document template
The toolbar above the table offers the following options:
- Move to front - moves the selected element to the front
- Move forwards - moves the selected element forwards
- Move backwards - moves the selected element backwards
- Move to back - moves the selected element to the back
- Move In/Out of table area - moves the selected element in/out of the transaction table
- Copy Selected elements - copies the selected element(s)
 Delete - deletes the selected element
Clicking an element in this list displays various editable properties fields relevant to the element.
Once selected, the component (as relevant) can be edited via the following options:
Position
This option enables the user to set the position and alignment of selected component(s).
Start/End Position
The user can alter the position and size of the selected element by editing the item’s start and end points both horizontally (i.e. x1 and x2) and vertically (y1 and y2).
Alignment
The alignment section offers the following tools:
- Horizontal – offers the option to align two or more selected elements horizontally along their left edge, centre, or right edge
- Vertical - offers the option to align two or more selected elements vertically along their left edge, centre, or right edge
- Spacing – offers the option to evenly space selected elements horizontally or vertically (requires three or more elements to be selected)
Please note that elements are aligned with the item selected first.
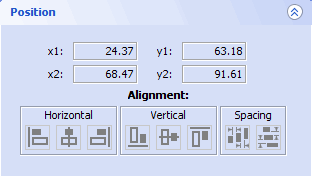
Table
The Table component enables the user to edit various aspects of the transaction table.
It comprises 5 tabs:
Lines Tab
The Lines tab enables the user to set the following values for Border, Horizontal and Vertical lines within the table:
- Width - use the up/down arrows to set the line width
- Unit Picker - set the line width unit type
- Line Picker - select line width from the drop down list
- Transparency - set the linetransparency using the slider
Header Tab
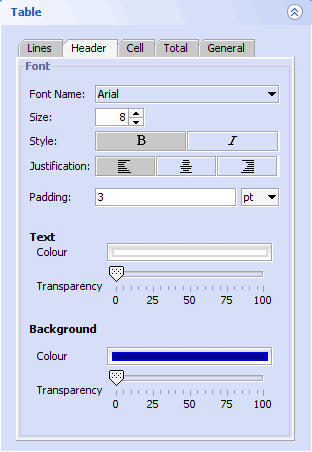
Within the Header tab the user can edit the following values for table headers:
Font
- Font Name - set the Font type within the table header
- Size - Set the font size within the table header
- Style - Italicise or Embolden the text within the table header
- Justification - Select if the text is left, centre or right aligned
- Padding - Set the amount of padding around the text
- Padding Unit - Set the unit type use for padding
Text
- Colour - Set the text colour
- Transparency - Set the text transparency using the slider
Background
- Colour - Set the table header background colour
- Transparency - Set the table header background transparency using the slider
Cell Tab

Within the Cell tab the user can edit the following values for table cells:
Font
- Font Name - set the Font type within the table cells
- Size - Set the font size within the table cells
- Style - Italicise or Embolden the text within the table cells
- Padding - Set the amount of padding around the text
- Padding Unit - Set the unit type use for padding
Text
- Colour - Set the text colour
- Transparency - Set the text transparency using the slider
Background
- Colour - Set the table cell background colour
- Transparency - Set the table cell background transparency using the slider
Total Tab
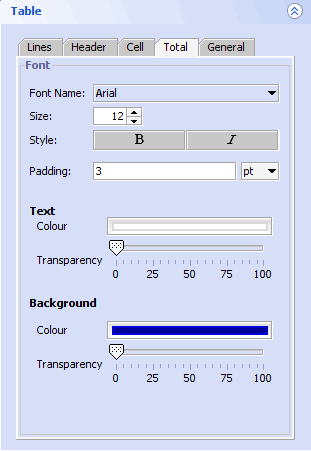
Within the Total Tab the user can edit the following values for the Total field:
Font
- Font Name - set the Font type within the Total field
- Size - Set the font size within the Total field
- Style - Italicise or Embolden the text within the Total field
- Padding - Set the amount of padding around the text
- Padding Unit - Set the unit type use for padding
Text
- Colour - Set the text colour
- Transparency - Set the text transparency using the slider
Background
- Colour - Set the Total field background colour
- Transparency - Set the Total field background transparency using the slider
General Tab
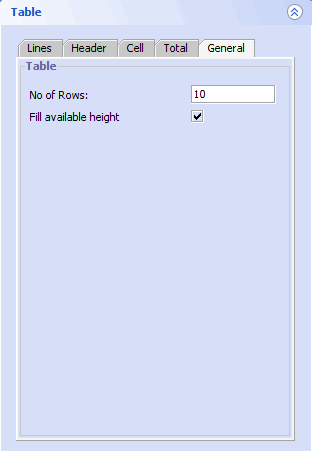
Within the General tab the user can set the following:
- No of Rows - sets the number of rows visible in the table
- Fill available height - ticking this box causes the table to remain the same (full) size as set on the template; unticking it causes the table to resize to fit the number of rows of data in the individual document
Image
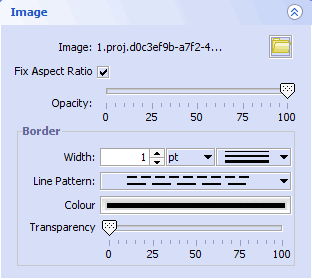
This panel displays the following options:
- Image - displays the current image file name
- Image Picker
 - click here to select a different image
- Fixed Aspect Ratio - ticking this ensures the image retains its aspect ratio when resized
- Opacity - this slider sets the image opacity
It also offers the following to edit the image border:
- Width - use the up/down arrows to set the line width
- Unit Picker - set the line width unit type
- Line Picker - select line width from the drop down list
- Line Pattern Picker - select the line pattern from the drop down list
- Colour - set the line colour
- Transparency - set the line transparency using the slider
Column Visibility
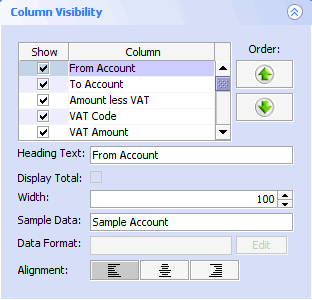
This panel enables the user to set various aspects of table column visibility.
- Show - ticking/unticking this box adds/removes the selected column to/from the transaction table
- Column - shows all available columns for this table
- Order - The user can move the selected column within the table using the up/down arrows (this moves the column left/right in the table)
- Heading Text - The user can edit the text displayed for the selected column
- Display Total - ticking this box causes the total for the selected ‘amount’ type column to display at the bottom of the table
- Width - here the user can edit the width of the selected column
- Sample Data - edit the sample date displayed for the selected column
- Data Format - click edit to change the format for amount type columns
- Alignment - sets the text alignment for the data in the selected column
Text
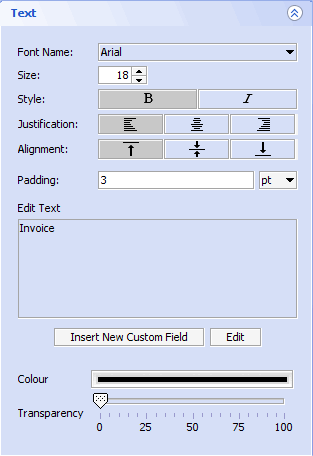
This option enables the user to set the following values for the selected text field:
- Font Name – sets the text font
- Size – sets the font size
- Padding – sets the padding around the text
- Style – enables the user to embolden or italicise the text
- Justification – enables the user to (right/centre/left) justify the text within the text field
- Alignment – enables the user to align the text (top/centre/bottom) within the text field
- Edit Text – here the user can edit the existing text in the field
- Insert Custom Field – enables the user to insert a custom field , such as Date or Page Number, or a user defined field, into the text area
- Colour – sets the text colour
- Transparency – sets the text transparency
Line
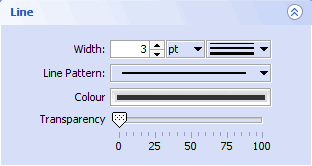
This option enables the user to set the following line values:
- Width – sets a value for the line’s width
- Width Unit – sets the width unit type, i.e. pts, mm, cm, inches
- Width – sets the line’s width (via a drop down menu)
- Pattern – sets the line’s pattern, i.e. unbroken, dotted, dashed
- Colour – sets the line’s colour
- Transparency – sets the line’s transparency
These apply not only to lines in isolation, but also to the perimeter lines of shapes such as squares or circles added to the template (see above).
Fill
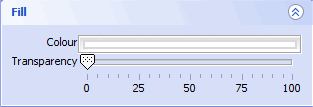
This option enables the user to set the following fill values for a shape (e.g. a square) inserted into the template:
- Colour – sets the shape’s fill colour
- Transparency – sets the shape’s fill transparency
Formats
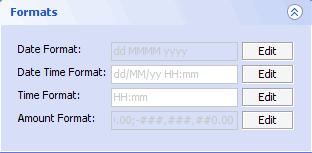
This option enables the user to adjust the following formats (previously set in the Templates Builder) for the selected component:
- Date Format – e.g. dd/MM/yyyy
- Date Time Format – e.g. dd/MM/yy HH:mm
- Time Format – e.g. HH:mm
- Amount Format – e.g. 0.00
Top Toolbar

This toolbar offers the following options:
- Finish Editing - this finishes editing and closes the Template Editor
- Page - this enables the user to view/edit different pages within the template, where applicable
- PDF – this enables the user to export the template to PDF
Bottom Toolbar

This toolbar offers a zoom function enabling the user preview the current template more easily. It comprises of the following options:
- Click to show the whole page – decreases the page size to display entire template
- Click to fill whole available canvas width – sets template width to that of the page
- Click to increase magnification of whole page – incrementally increases page magnification
- Click to decrease magnification of whole page – incrementally decreases page magnification
- Set zoom% - sets zoom value (as a percent, via dropdown list)
- Mouse coordinates - displays the mouse coordinates on the screen
- Mouse coordinate units - offers the option to change the unit type displayed for the mouse coordinates