
Desk Diary
Introduction
This is where you can keep track of your appointments.
The Desk Diary component consists of 2 panels. The left panel contains the calendar itself, and dates with entries relating to them are coloured in red.
You can select a date by left clicking it. When you do so, the selected date is shaded in blue.
The right panel is where you can create, edit and delete entries. You can view all future diary entries and create a prioritised ‘To Do list’. There are 4 tabs above this table:
- Diary Entries
- Update Diary
- Future Entries
- To Do List
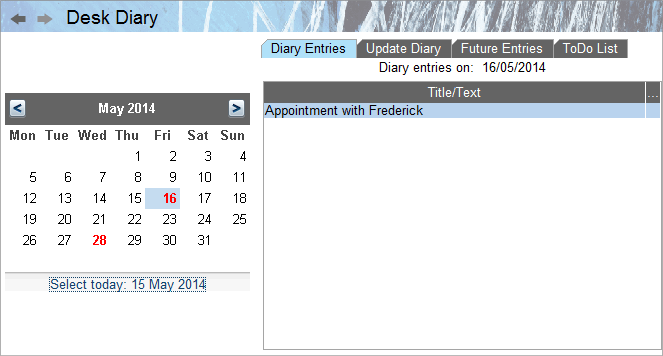
Diary Entries
This tab (see above) shows all your dairy entries for the date selected. Left clicking on a red date will take you directly to this tab. The Reminder Status field shows if you have any reminders set for these entries. To edit an entry, double-click it; this will take you to the Update Diary tab.
Update Diary
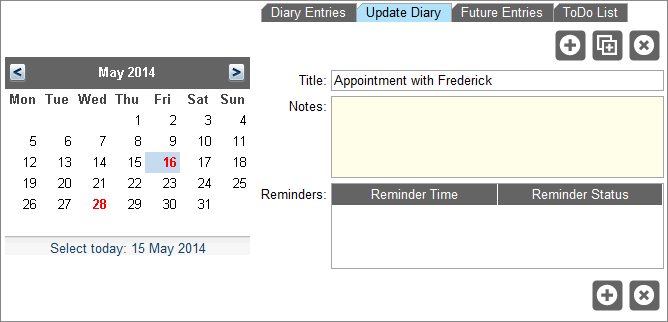
This is where you create/edit/delete calendar entries, and set reminders for them. The top half of the table has two fields, Title, where you enter the title of your new entry, and Notes, where you can enter a more in depth description of this entry. These fields are also where you would edit an existing entry (N.B. data entered in these fields is automatically saved).
This table has the following icons above it:
 Add Entry – click this button when you wish to add a new diary entry for the selected date.
 Repeat Entry – here you can create recurring diary entries (based on existing entries). You can set how often and how many times you would like an entry to be inserted.
 Remove Entry – here you can delete the entry being viewed, plus any recurring entries based on this one.
To create a diary entry, click the Add Entry icon, and then enter the Title of your entry in the Title field, and a more detailed description (if you wish) in the Notes field.
If you wish to create a repeat entry, go to an existing entry, then click the Repeat Entry icon. Select how often and how many times you would like this entry to be made, then click OK.
To delete an entry that you are viewing, click the Remove Entry icon, and select (as relevant) if you wish to remove just this entry, any repeated entries based on it, or both.
The lower half of this table is where you can set Reminders for a calendar entry.
It has two columns:
- Reminder Time - when your reminder is scheduled for. At the specified time, the reminder will pop-up on your screen.
- Reminder Status - a tick in this field shows that a reminder has been set for this entry.
To create a reminder, click the Add Reminder icon.

A pop-up screen (see above) will appear where you can set when you would like the reminder to occur.
At the allotted time a pop-up screen will appear to remind you about the selected event.
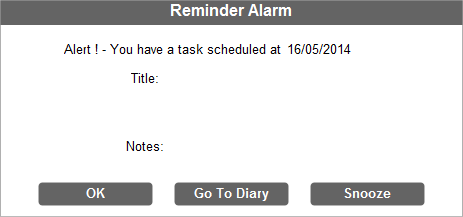
Select ‘OK’ to acknowledge that you have seen the reminder, ‘Go to Diary Entry’ to view the relevant entry, or ‘Snooze’ if you wish to reset the reminder for a later time.
To delete a reminder, select a reminder by left clicking it once, and click the Remove Reminder button.
Future Entries
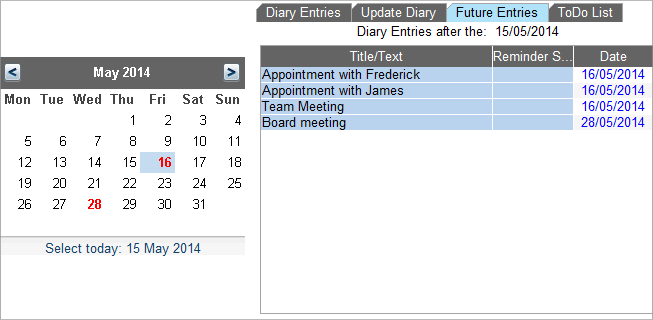
This field shows a complete list of your future diary entries (relative to today’s date). Double-clicking on any entry will take you to the Update Diary where you can edit/delete/set a reminder for this entry.
To Do List
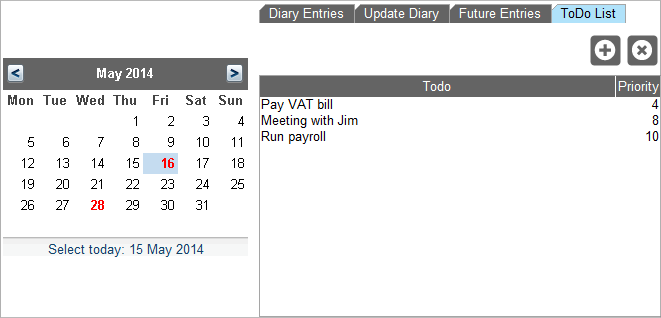
Here you can create a list of pressing tasks and give them a priority value (on a scale of 1 to 10, 1 being most urgent).
The table has 2 columns, ‘To do’ and ‘Priority’. The first details a description of any task you have added to this list, the second relates its level of urgency.
There are 2 buttons above this table:
- Add a To Do note
- Remove a To Do note
Click the Add a To Do note icon to create a new line in the list. Type a description of your new item, and select a priority for it by left clicking the number in the ‘Priority’ field. A pop-up field will appear where you can select the item’s priority.
The list will automatically sort itself in order of priority. To edit an item, simply left-click in the field you wish to change.
To delete a To Do note, select the item you wish to delete, then click on the Remove a To Do note button.