
Document Editor
Introduction
Within this component you can view/edit the currently selected document, and once satisfied, print/email/save/create it as a PDF file.
Whenever you create a new document, or edit an existing one, it is launched in this screen for editing and printing.
The Document Editor comprises of two separate tabs:
- Data Tab - allows you to preview and modify the data contents of a particular document (visible for Sales Documents only).
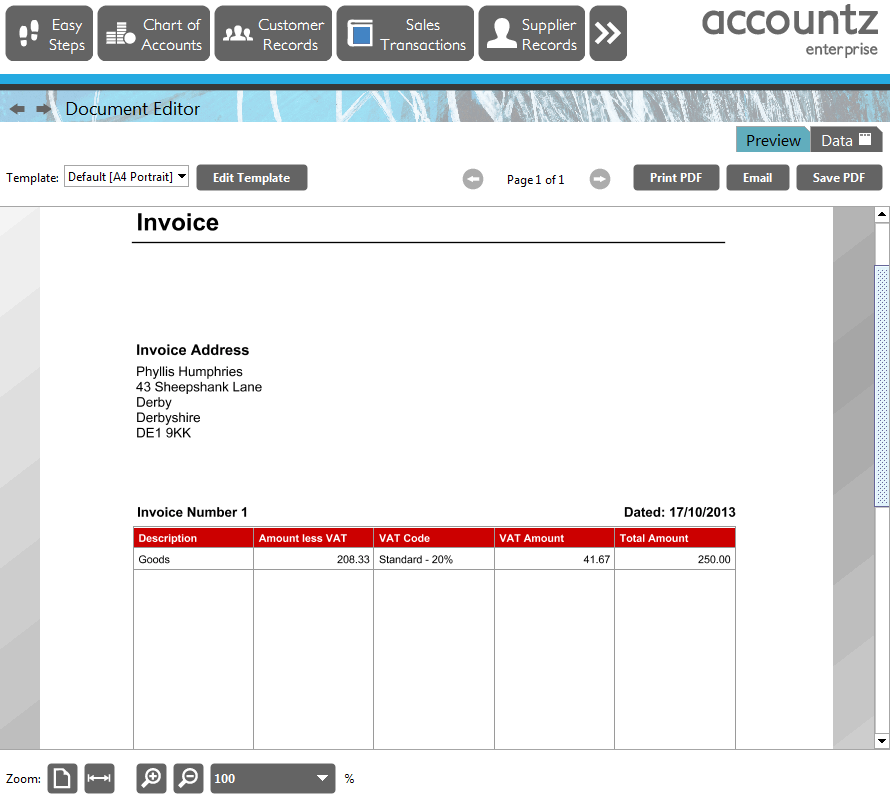
- Preview Tab - allows you to view the design and layout of the document, and edit/select a different template if required.
Data Tab
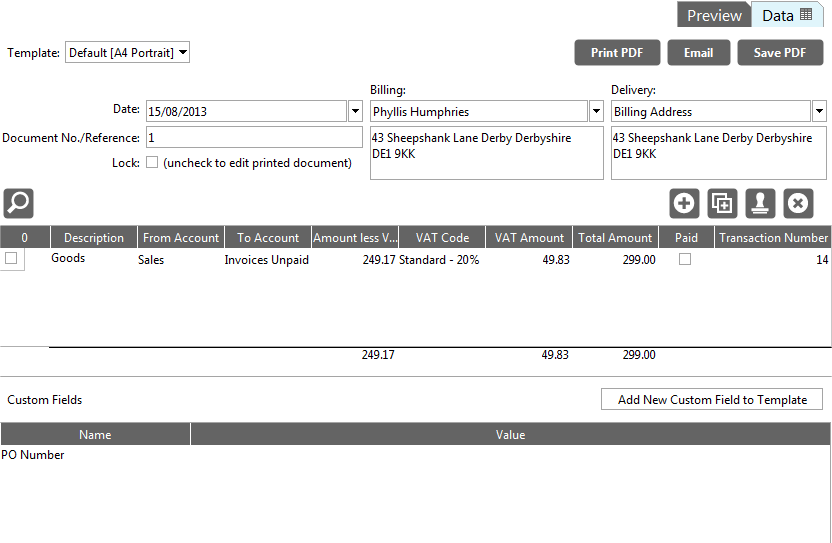
The Data Tab is only visible for sales type documents, i.e. Invoices, Quotes, Credit Notes and Purchase Orders.
The tab displays the underlying detail for the selected document. The screen comprises three panels.
Top Form Panel
The top form panel contains 7 items that represent information about this document. They are:
- Template - Contains a drop-down list from which you can choose which template to use for this invoice.
- Date - Sets the tax date for all transactions within the invoice
- Billing - Contains a drop-down list from which you can choose the customer / supplier. The billing address is displayed below.
- Delivery - Contains a drop-down list from which you can choose an alternate delivery address if available. The delivery address is displayed below.
- Document No./Reference - This is set in the Templates window. You can set your preferred number here and any new documents will auto-increment.
- Lock - Checking this box locks the document (and any transactions associated with it). Once the document has been printed, this is checked automatically.
The following options are also available above the panel:
 Print PDF - Enables the user to print the document as a PDF file
 Email - Enables the user to email the document
 Save PDF - Enables the user to save the document as a PDF file
Middle Table Panel
The middle table panel allows you to add|edit|copy|remove transactions to the invoice (n.b. each line you add in the table also creates a transaction in the Sales Transactions component (for invoices)).Click on Add Transaction to add a new line to the table.
The table has the following fields, the first five of which must be completed for each transaction line:
- Description
- From Account
- To Account
- Total Amount
- VAT Code
- VAT Amount
- Amount Less VAT
- Paid
Enter the description of the sales transaction within the Description field. If you want to write more than one paragraph of description for a transaction, press Shift+Enter twice at the end of your first paragraph.
N.B. The From and To Account fields can be given a default setting in the customer’s entry within Customer Records to save you from filling them in every time you create an invoice.
You can also add/remove the following columns to/from the table by right clicking anywhere on a column heading and selecting from the columns menu:
- Quantity
- Unit Price
- Unit Price Less VAT
- Notes
- VAT Date
- Paid Date
- Cleared To
- Cleared From
- Date Created
- Error Code
- Deleted
- Transaction ID
- Transaction Code
Custom Fields Panel
The bottom panel enables the user to add custom fields to the document template, and then set the custom data for the particular document. For example, you may wish to include a Purchase Order No. field on your invoice.
It comprises the following options:
- Add New Custom Field to Template - Click this to add a new Custom Field to the template.
- Name - Displays the names of any existing Custom Fields .
- Value - Editable field where the user can set the custom field value for the current document.
Preview Tab
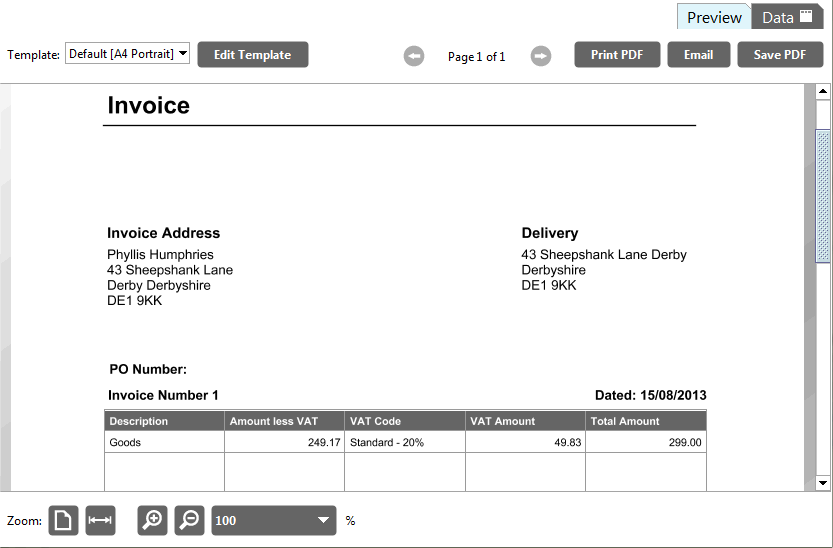
The Preview Tab displays your document as it will look when you come to print/output it. It offers the following tools:
Top Toolbar
The following tools are located at the top of the screen:
 Template - Drop down list enabling the user to switch templates
 Edit Template - Clicking this button enables the user to edit or create a new template based on the current one in the Template Editor component.
 Page - Clicking the left/right arrows enables the user to view the different pages of the document (if applicable)
- Print PDF - Enables the user to print the document as a PDF file
- Email - Enables the user to email the document
- Save PDF - Enables the user to save the document as a PDF file
Please note that double-clicking on the canvas has the same effect as clicking the ‘Edit’ button.
Bottom Toolbar

This toolbar offers a zoom function enabling the user preview the current document more easily. It comprises of the following options:
- Click to show the whole page – decreases the page size to display entire document
- Click to fill whole available canvas width – sets document width to that of the page
- Click to increase magnification of whole page – incrementally increases page magnification
- Click to decrease magnification of whole page – incrementally decreases page magnification
- Set zoom% - sets zoom value (as a percent, via dropdown list)