Using Home Accountz
Introduction
The main aim of Home Accountz is to help you keep control of your finances. Once you have grasped the basics, the rest will come easily.
Most of the action will take place in the main component: the Accounts window (where all your accounts are listed).
The Accounts window consists of two panels. The left panel shows all your accounts and their structure, the right panel has a number of tabs to let you enter new transactions, set budgets, view reports and forecast ahead. It is described in greater detail here: Accounts, Balances and Budgeting.
You can enter what you like to get you started, as everything you enter can be edited, or deleted, as necessary.
The golden rule to understanding the program is that everything in the accounts window is an account. Instead of using categories, you just set up a group and add accounts to it. Accounts can be real, e.g. a bank account, or they can be used for tracking things such as income and expenditure.
The great thing about Home Accountz is that you can see everything happening in the accounts window. You will see money coming and going in and out of your bank account, how much money you are spending each week on food and petrol, clothes or takeaways.
All of this happens when you enter transactions into the software. This can occur in the Transactions tab on this screen, or in the main Transactions window.
This then changes the figures in the Accounts > Balances panel. Enter some transactions, then toggle between the two views to see the effect.
The Accounts component is accessed by clicking the Accounts, Balances & Budgeting icon at the top of the screen, or by selecting Accounts>Accounts, Balances & Budgeting from the main menu.:
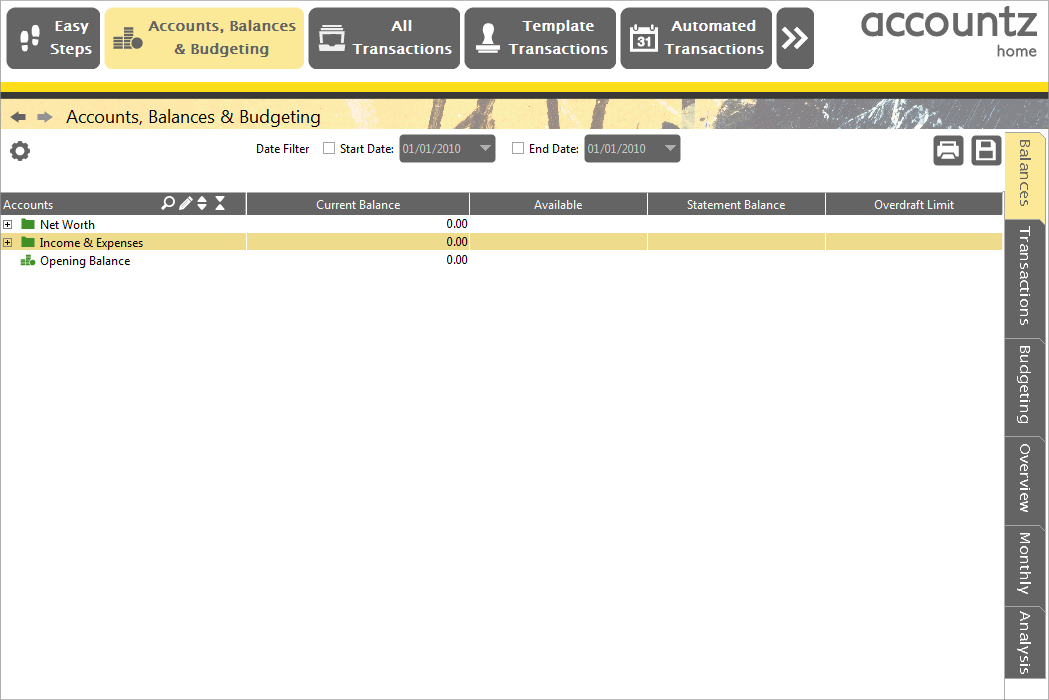
Accounting Software main application
The accounts are set up in a tree structure. If you click on the plus sign beside an account group, for example ‘Net Worth’, you will see the group open to reveal further accounts and groups contained within.
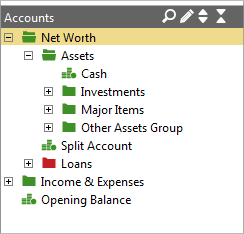
Accounting Software net worth
Here, you can see that ‘Assets’ is an account group, containing further accounts, such as ‘Bank’ and further account groups, such as ‘Investments’ and ‘Major Items’.
You can add more groups and accounts. You can move accounts between groups (provided they are compatible, for example moving an Income account into an Expense account is not possible). You can rename accounts. You can delete accounts (provided there are no transactions in them).
Similarly, if we open the ‘Income & Expenses’ account group, we can see that a number of accounts have been set up, which we will use for transactions involving income and expenditure.
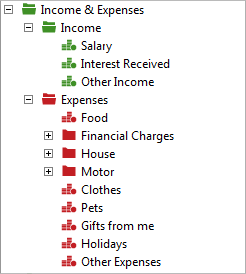
Accounting Software revenue group
Here, the Income & Expenses account group contains a further account group named ‘Income’ and another named ‘Expenses’, each containing further income and expense accounts.
You may wish to add further accounts and account groups to this structure to more accurately describe your home accounts.
How to add/remove/edit accounts and account groups
Open the Account Manager window by clicking on the ‘Edit’ button  above the left hand Accounts table. You can add, delete, rename, move and create new groups from here. Click here for more information.
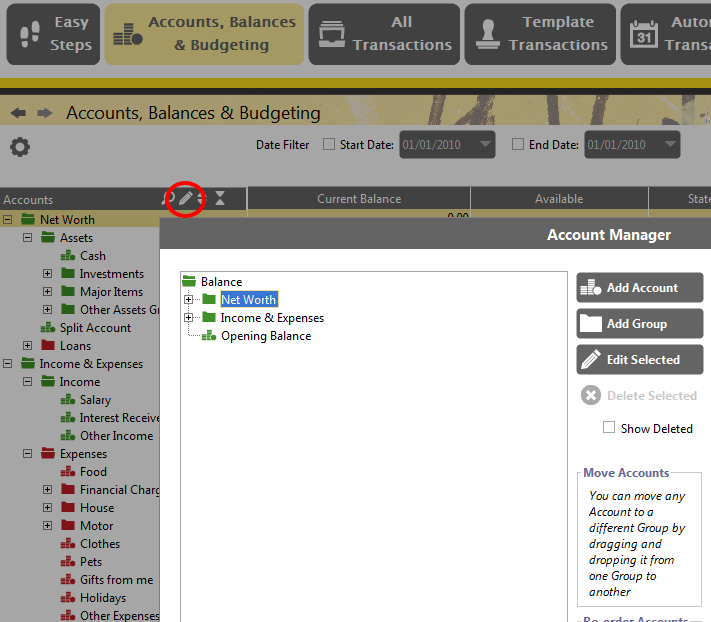
Accounting Software account_manager
Entering Transactions
Now we need to turn our attention to transactions. These can be entered in two places, the Transactions tab within the Accounts window (if you only wish to enter transactions for one account), or the main Transactions Component. See Entering Transactions for more information.
Both options are equally valid, it is a matter of personal preference. For the following examples we will use the Transactions tab in the Accounts window.
Whatever you type into the Transactions tab effects the balances in your Accounts immediately.
Opening balances
Opening balances are initally set via a wizard process when you create a new data file (File>New File).
However, if you need to add a new bank account at a later stage (using the Account Manager component), you will need to manually enter the opening balance for this account (at this point, it helps if you have a current bank statement to hand).
First, find your bank account. The fastest way is to open the search bar (click on the Magnifying Glass icon in the toolbar above your accounts in the left hand panel) and enter the name of your bank in there. Any part of it is fine. If you did not change your bank name in the setup wizard, just enter ‘bank’ (without the quote marks) and press the Enter key.

Accounting Software search
The account groups will open and the first account it finds that matches your search will be highlighted. Select that account and click on the Transactions tab.
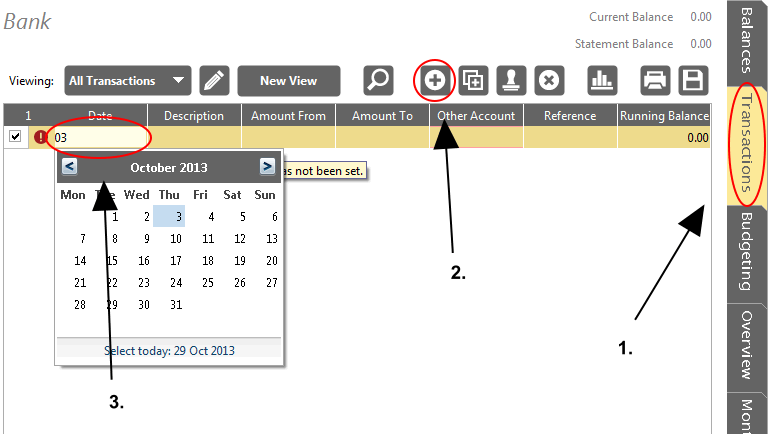
Accounting Software add transaction
![]() Click on the Add New Entry button
Click on the Add New Entry button
Enter the date of the opening balance into the date field.
You can type it in any format e.g. 03/10/2013 or 03.10.2013. You don’t even have to type in the whole date, you can just type 03/10 and press enter. Home Accountz will fill in the rest for you.
When entering a date, if you hit the Enter key without typing any numbers, it will automatically enter today’s date if there are no other entries in the table, or it will copy the date from the line above if one has been entered previously.
We need to tell the computer that we are entering an opening balance for Bank Account. Assuming the opening balance was positive (i.e. you had Amount To the bank and were not overdrawn) enter 500 in the Amount To column. You can track opening balances by connecting this entry with the default Opening Balances account. So select the Other Account field and start typing Open.. As soon as a match is found the drop down selector menu will display so you can pick the relevant account.
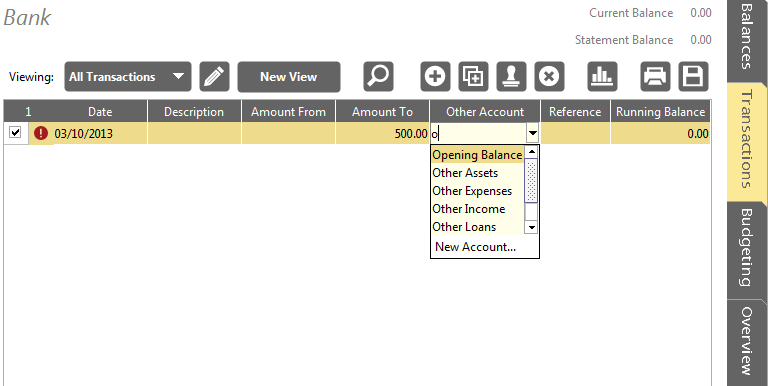
Accounting Software opening_balance
Select the Balances tab and check that your bank has a balance of 500.
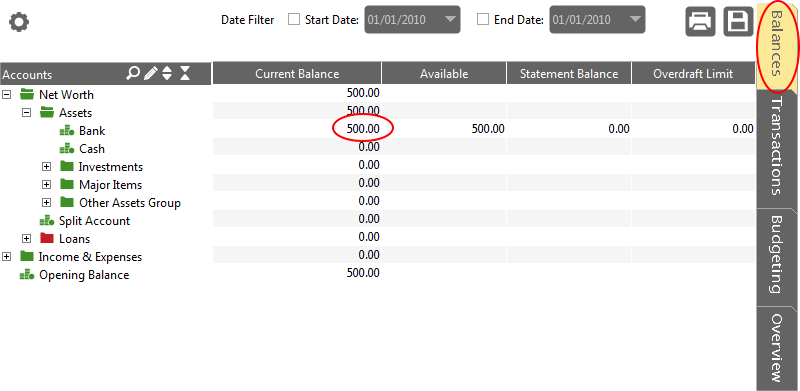
Accounting Software balance
If your bank is overdrawn, then enter the amount in the Amount From column instead.
You have just made your first entry. Now we will go on to add some more entries, by then you should have a grasp of the basics.
Adding an income entry
Click on the Transactions tab again and click on the Add New Entry button.
Enter any date you like. Enter 1000 in the Amount To column. Type Sal in the Other Account column and select Salary when it appears.

Accounting Software salary
You can enter a description too if you like, it is up to you.
Now, have a look at the account balances tab. You will see the effect that entering your salary has had on your bank balance.
Entering a payment entry
Let us say you have just been to the local supermarket to do your weekly food shop, and you paid by debit card. This can take a few days to show up in your bank account.
This could cause you problems because you might forget about this payment and think you have more Amount To your bank account than you actually have.
This is where Home Accountz comes into its own. If you save your receipts and enter them into Home Accountz, the balance that will show up under your bank account will be a true balance.
That is to say it will reflect all your entries (both cleared and uncleared). You will always know how much money you have. This will also enable you to double-check your bank statement when you receive it later.
Press the Enter key a few times to progress to a new row or use the Add New Entry button to add a new row to the entries window.
Now type in the date of the transaction, this is normally on the receipt. Press Enter to confirm the date.
Enter 50 in the Amount From column and select Food in the Other Account column. As you enter each transaction, you can see the running balance on the right.
Note that you can rearrange any of the columns by dragging them left or right. You can also resize columns.

Accounting Software payment
Paying off a credit card
You can do this from the Bank Account or from your credit card account. It doesn’t matter which, as long as you only enter it on one or the other not both (or you will duplicate it).
Assuming you are still in the Bank Account, click on the Transactions tab, enter a date, enter 500 in the Amount From column and select your credit card from the Other Account column. That’s it! All done. Simple.

Accounting Software credit card
We have now used the Transactions tab in the Accounts panel to enter various transactions, so let us see what effect it has had in the Balances tab.
As we have been inputting all the information from our receipts etc., the balances have been changing (anything entered in the Transactions tab automatically updates the account balances).
You can now see how much money you have left in your bank account at any time. You can also see exactly where your money has come from (e.g. Salary, Pension, Interest Received, Birthday Gifts) and what you have spent it on (e.g. Food, Gas, Home, Insurance etc.).
