Data Entry Tips
Introduction
All Accountz software includes the Rapid Data Entry system. This is designed to help you to enter your data more quickly.
Most of it revolves around entering data directly into the transaction tables (all data is immediately auto-saved). That is, without having to use dialogue boxes and having to click on ‘OK’ and ‘Yes, I really did mean to do that’ buttons!
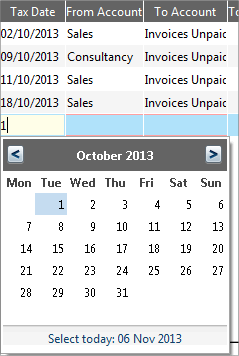
Almost every column has some kind of helper attached to it. The date picker is interactive. Start typing a date and the calendar opens and reacts to everything you type. Press the Enter key when the date is what you want – even after entering only the day of the month.
Entering Dates

Accounting Software Data Entry
The date picker is interactive. Start typing a date and the calendar opens and reacts to everything you type. Press the Enter key when the date is what you want – even after entering only the day of the month.
Anywhere within the program where you can enter a date, if you press the Space bar or start typing a date then a small Calendar will pop-up allowing you to select a date to be entered into the field.
You can enter the date using the keyboard, and as you enter the date the calendar will jump to that point. You can use any type of punctuation as a separator (eg. a space, a full stop, a forward or backslash etc.) and you do not have to include zeroes for numbers less than 10.
Press the Enter key if the calendar shows the date you want or double-click on a day to select it with the mouse.
Formulae

Accounting Software screenshot amount formulae
The Total Amount field in any transaction table has the capacity to handle formulae. Simply enter ‘=’ followed by your formula, hit enter, and the software will make the calculation for you automatically.
Lookup Lists
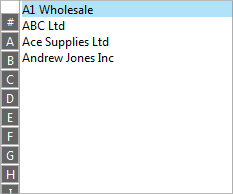
There are many types of lookup lists including alphabetically organised lookup:

Accounting Software screenshot lookup lists 1
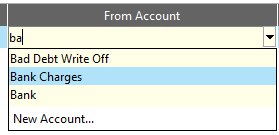
Filtered drop-down lists:

Accounting Software screenshot filtered list
The filtered drop-down lists work intelligently. If you press spacebar before you have typed anything, a list of all the names available will appear. The more you type the more the list filters the result. You can press Enter at any time to insert the currently highlighted entry in the list, or you can use the Up/Down arrow keys on the keyboard to choose a different name from the list.
This means you can keep your hands on the keyboard which will keep your speed of entry high. Finally you can also double-click directly on an item in the list with the mouse, if you prefer.
Templates

Accounting Software templates
The Templates feature (if it is enabled in your version) enables you to enter near-complete transactions into any transaction table with a single mouse-click, leaving just the date and amount fields remaining to complete the transaction.
The screenshot shows a number of templates set up in the lower panel, together with how they appear in the drop-down selection menu in the upper panel.
Once you have set up some of these, you can enter transactions with just a single mouse click (i.e. click on one of the template names available from the drop-down list. All you need to do to finish the transaction is enter a date and an amount.
For template where you know the amount, you can include this information too.
Tables
Sorting
Click once on any column header and it will sort the table by that column. Click again and the sort will reverse. Click a third time to turn sorting off.
You can also right click on any column header and choose the sort option from the menu.

Accounting Software screenshot columns sorting
Sorting columns is a great way of finding items quickly. For example when trying to locate transactions of a certain value, sorting on, say, the Amount column will not only put all the transactions of the same value together, you will also see those that are close to the value you are after.
Columns - hide/show
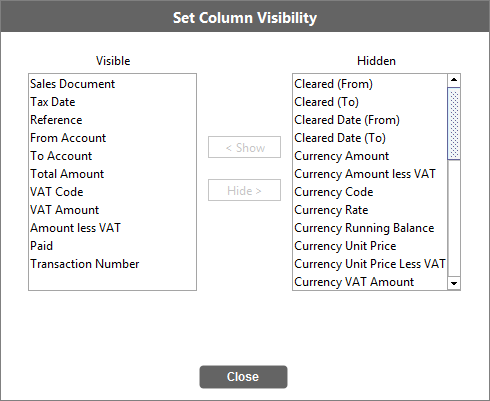
By right clicking on any of the column headers within a table, then choosing ‘Columns’ from the menu which appears, you can add and remove columns as you wish. By turning off the columns you don’t need (eg. VAT if you are not VAT registered) it will help speed up data input.
If you only have a single button mouse, press the Control key (Ctrl) at the same time.

Accounting Software screenshot columns show
To make a column visible in a table, select it from the ‘Hidden Columns’ list and click the ‘Show’ button. To hide a column, select it from the ‘Visible Columns’ list, and click the ‘Hide’ button.
Swapping columns
You can drag any columns left or right thereby swapping the column order. One useful consequence of this is if you want Business Accountz to automatically calculate and add VAT to a transaction. To do this swap the Amount Total and Amount less VAT columns over. Now when you type the amount less VAT and enter S for standard rated VAT the VAT will be calculated and added on (rather than the default of assuming the transaction includes VAT).
Column widths
The column widths on any of the column headings within a table can be reduced or enlarged by dragging the mouse on the column separators. If you have a lot of columns turned on and are using a low resolution, this can keep the whole table in view (rather than having to use scroll bars to see your data).
Views
You can filter most of the tables in any way you like to either restrict the data to what is relevant to you at the time (eg. Last month’s transactions) or for a report you want (eg. uncleared bank account entries).
These filters are created in the View Builder .
