Table Toolbars
Selecting A View

Accounting Software view selecting
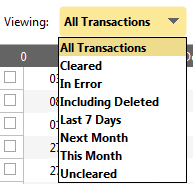
Click on the drop down list of views. Views let you filter your data in many different ways. For example, to reconcile a bank account, select the Uncleared transactions view. When you have reconciled (or cleared) your transactions, select the Cleared transactions view to get a look-alike statement complete with running balance so you can visually see if there are any mistakes.
Editing the Current View

Accounting Software filter selecting button
Click on the Open/Close the view editor panel button to open the control panel.
Now click on the Filter tab on the left of the View panel. Click on the Add Column Condition button to set rules for this view. For example, select the Cleared From column from the list. This will add a new rule in the table on the right. If you set the value to true by clicking the check box, this view will only include transactions that have their from side cleared. Add another column condition and set the to side to be cleared, make sure the 2 columns have the AND symbol in the left hand column, and you have created a copy of the Cleared view!
The third tab is the Chart tab. Select the style of chart by clicking on any of the Main Chart Type buttons, then select a Sub Type under that. On the right select the column you want for the horizontal axis (typically the Date column). Now select the data series. For a bank style chart you may want to chart the Running Balance. You can also add labels to the chart for horizontal, vertical axis as well as the chart title.
You can also choose to show the column names that have been selected for the chart by clicking the Show Legend check box.
To display the chart, click on the Chart button in the toolbar. To turn off the chart, click the button again.
To turn off the View panel, click the View panel button again.
Please note that for certain default views, only the Chart functionality can be edited.
Creating a New View

Accounting Software create a new view button
Click on the Create New View button to create a new view. Give the view a name so you can easily select it in the future. You can set the view to always sort on a certain column. This is how the Cleared view was made for example.
Conditions for the new view can be set as per ‘Editing the Current View’ (above).
You can also set the columns to display specifically for this view as well as the column widths.
Searching Transactions

Accounting Software search button
Click the magnifying glass button to open the search box. Type in any part of what you are looking for, e.g. an amount, description etc and press the Enter key. All transactions will be highlighted. Use the red arrow button to move from one match to the next.
Click the Highlight All button to see all matches. If you want to make the search case sensitive, click the Match Case button.
Adding a New Transaction

Accounting Software add button
Click the green plus sign button to add a new transaction.
Copying a Transaction

Accounting Software copy button
Select a transaction then click the copy button to make a copy of a transaction.
Inserting a Template Transaction

Accounting Software template button
Click the Insert Template button to insert a template transaction. These are commonly occurring transactions that you can preset and then recall with a click from a drop down menu. This makes entering commonly occurring transactions such as cash withdrawals, food or fuel really fast.
Delete a Transaction

Accounting Software delete button
Select a transaction then click the red cross button to delete it. Another transaction will be highlighted after the delete so take care not to press it again.
We recommend you turn on the Lock column so you can manually lock transactions you are happy with. Note that even after locking you can still clear a transaction when you reconcile an account, so use the lock mechanism with confidence.
Note that you can undelete transactions too. Select the Deleted transactions view from the drop to see and undelete them.
Show/Hide Chart

Accounting Software chart button
To see a chart of your current View, click the Chart button. Click again to turn off the chart.

Accounting Software print button
To print the current view, click the Print button.
Export to CSV

Accounting Software export button
To export the current view, click the Export to CSV button. You can then import your data into any spreadsheet.
