
Shares
Introduction
Whilst Home Accountz does not track share prices, it is possible to record the cost of shares bought and sold and manually keep track of their value.
Overview
Essentially, in order to keep track of shares, you will need to do the following:
- Set up the software Configuration (Tools>Configuration) to allow zero amounts in the Quantity field and negative amounts in your transaction tables.
- In the Accounts, Balances and & Budgeting component, add a Shares account group to your Assets Group, and in this create Share accounts (type=asset) for each company’s shares that you own. You will also need to create an account titled ‘Share Gains and Losses’ (type=income), this time in the Income and Expenses group.
- In the Transactions tab for one of your share accounts, create a new view (called ‘Shares’) based on the default ‘All Transactions’ view, and edit the columns visible to include both ‘Quantity’ and ‘Unit Price’ columns in your table.
- To enter a transaction recording a purchase of shares, create a transaction in the Transaction Tab for the relevant share, filling in the no. of shares purchased in the Quantity field, and the share price in the Unit Price field. The ‘Other Account’ will be the account used to purchase the shares, e.g. Bank. This will calculate the shares’ total value, which is represented by the Running Balance total at the bottom of the screen (similarly, the total no. of shares owned is represented by the Quantity total at the bottom of the screen.
- Next, we will need to enter regular correcting transactions (say, once a month) to ensure our share value remains accurate. Create a transaction in this table, with ‘Share Gains or Losses’ as our ’Other Account value. The Amount entered is determined by manually calculating the total current value of our shares (i.e. total number of shares owned multiplied by their current price), and subtracting the previous line’s Running Balance value from this total. If the number calculated is positive, enter this in the Amount To field, if negative in the Amount From field. Also, importantly, please ensure the Quantity value is set to zero.
- If we sell some shares, create a new transaction with both the Unit Price and Quantity entered as negative values. So if we sell 4 shares at a value of £6.45, enter these as -4 and -6.45. This ensures the total value of the shareholding remains correct.
- For clarity, it is a good idea to create a further View set to consolidate transactions on the Reference field, while making sure that the Reference field value for your correcting transactions is always the same, e.g. ‘ ’ or ‘shares’. This will consolidate all correcting entries into s single line on the table.
Set up the Software for Shares
First, let’s edit the Configuration component.
Accounting Software shares 1
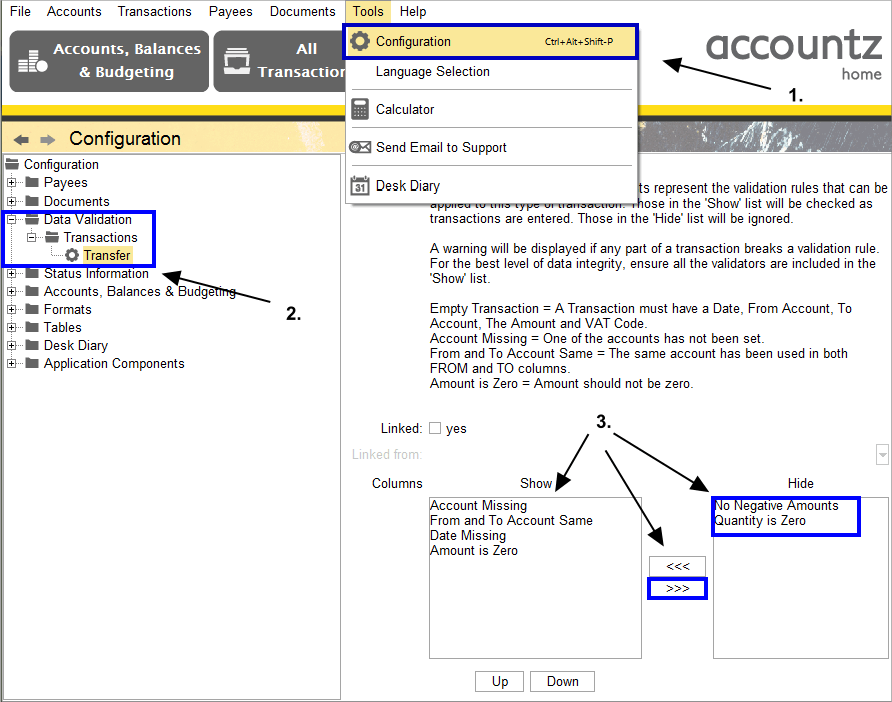
- Select Tools>Configuration from the main menu.
- In the left hand panel open up the Data Validation folder within the tree structure (click on the plus sign to open a group), and select ‘Transfer’.
- Within the right hand ‘Show/Hide’ panel, select ‘No Negative Amounts’ and ‘Quantity is Zero’ and click the right arrow, so that these two items are visible in the ‘Hide’ column.
Accounting Software shares 2
Next we will add an account group and some accounts to represent our shares.
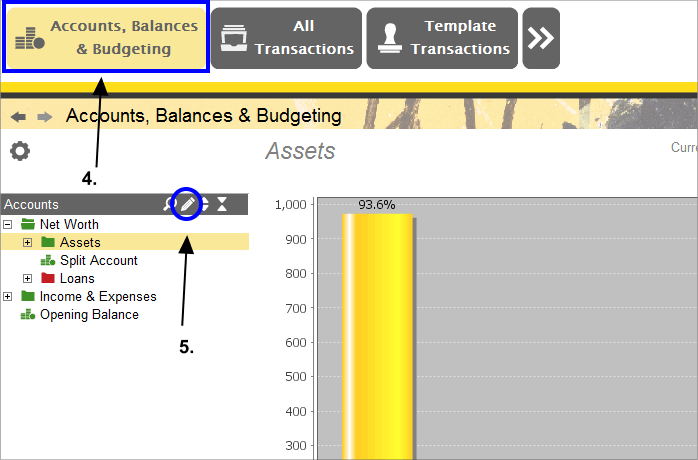
- Click on the Accounts, Balances & Budgeting tab.
- We will add a Share Group to the Chart of Accounts. To do this, click on the Accounts Manager icon (pencil).
Accounting Software shares 3
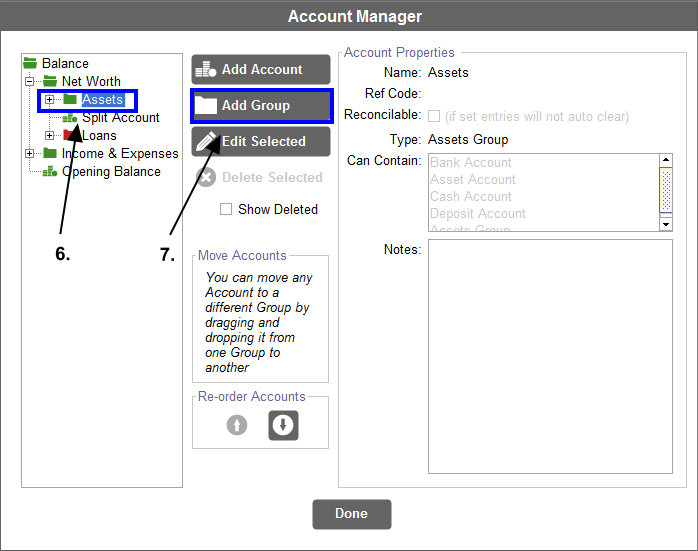
- Next, select where we want to put the group (in this case within the Assets group) by clicking on it.
- Click ‘Add Group’.
Accounting Software shares 4
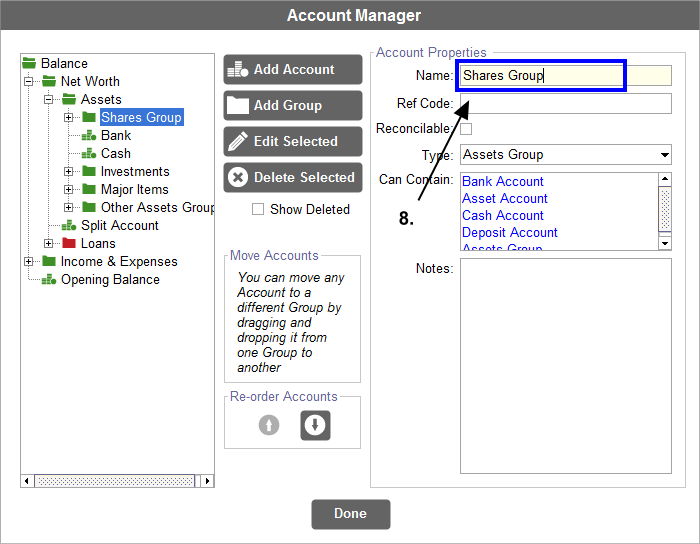
- Enter ‘Shares Group’ in the right hand ‘Name’ field for this new group. Click the enter or tab key for the name change to take effect (N.B. you can alternatively click ‘Done’ for the name change to take effect, but this is a slightly longer winded method as you will close the Accounts Manager in the process and need to re-open it immediately).
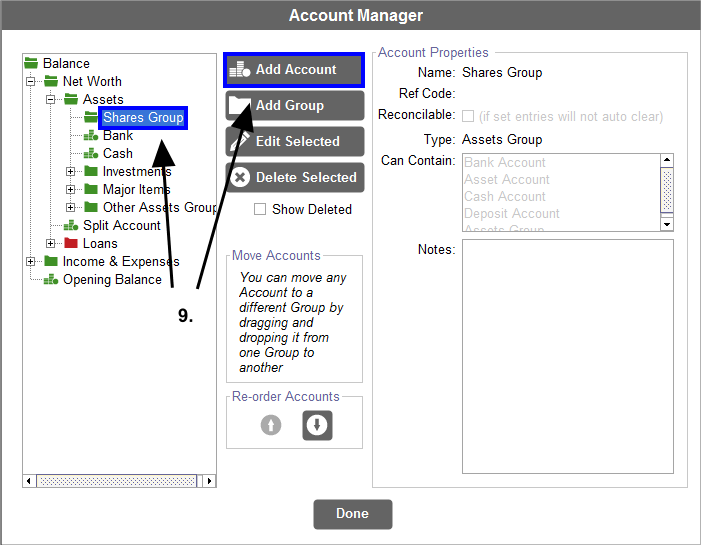
Accounting Software shares 5
- Next we will add an account for each share we own. Make sure ‘Shares Group is selected as the target group, and click ’Add Account’.
Accounting Software shares 6
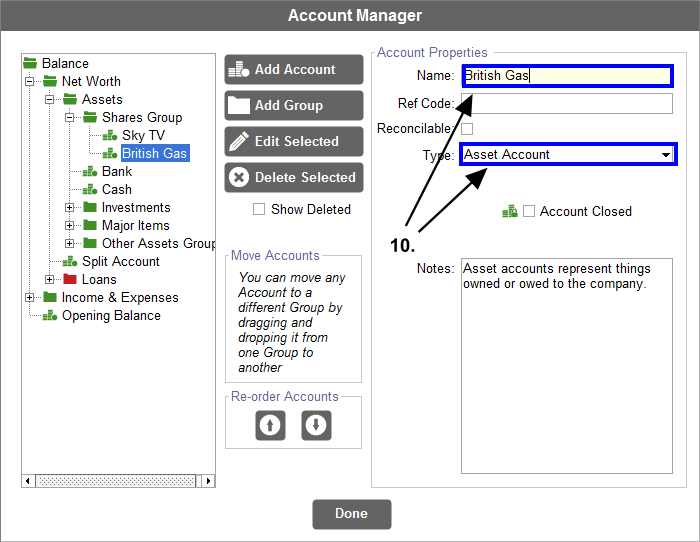
- Rename the account accordingly, make sure the ‘Type’ is set to ‘Asset’ and repeat the process for any other shares as necessary.
Accounting Software shares 7
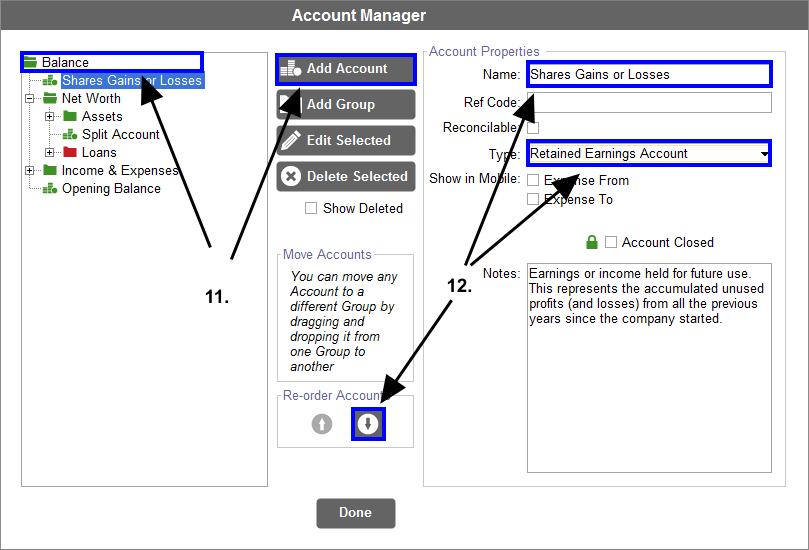
- Finally, we will need to add an account to the Income & Expenses Group to represent the gains/losses we make on our shares. So, ensuring this group is selected in the left hand table, click ‘Add Account’.
- Rename the account as ‘Share Gains or Losses’, and set the type to ‘Income’. Click ‘Done’ to close the Accounts Manager.
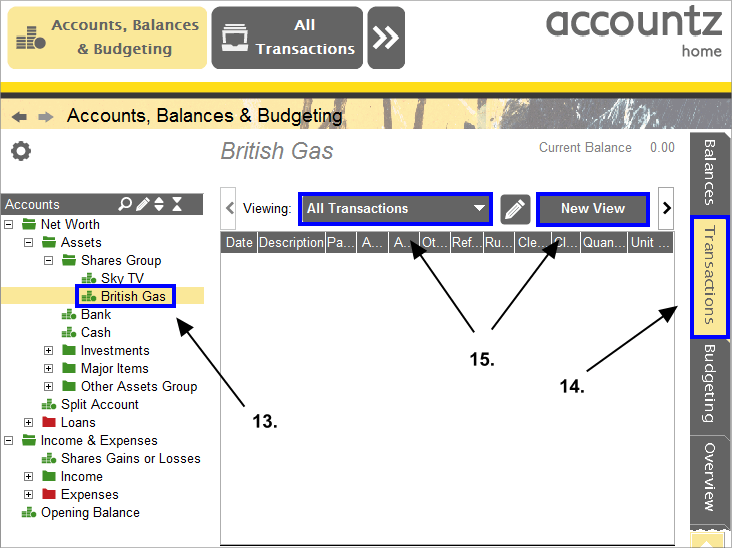
Next we will create a Shares view.
Accounting Software shares 8
- Select one of our share accounts from the Chart on the left (i.e. ‘British Gas’).
- Select the Transactions Tab.
- Make sure the ‘All Transactions’ view is selected, then click ‘New View’.
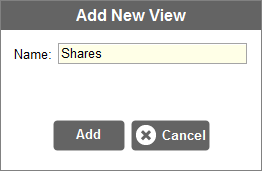
Accounting Software shares 9
- Rename the view ‘Shares’, and click ‘Add’.
Accounting Software shares 10a
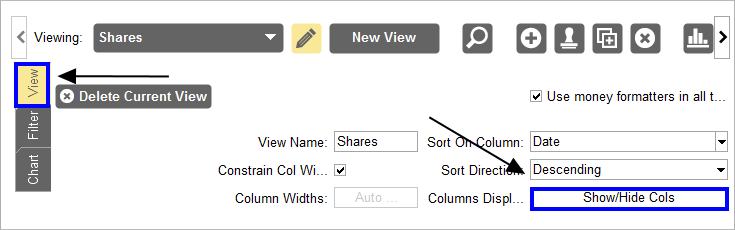
- Click the ‘View’ tab, and then click ‘Show/Hide Cols’.
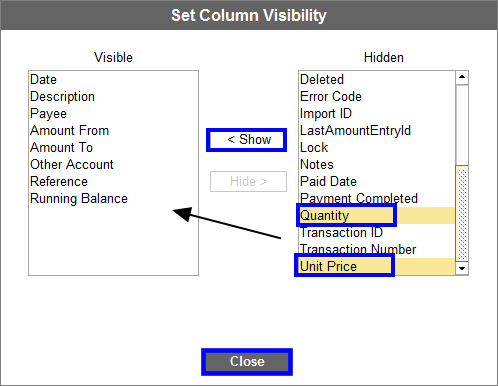
Accounting Software shares 10
- Select ‘Quantity’ and ‘Unit Price’ from the ‘Hidden’ column, and click the ‘Show’ button, so that they are listed in the left hand ‘Visible’ column. Click ‘Close’.
Entering Share Transactions
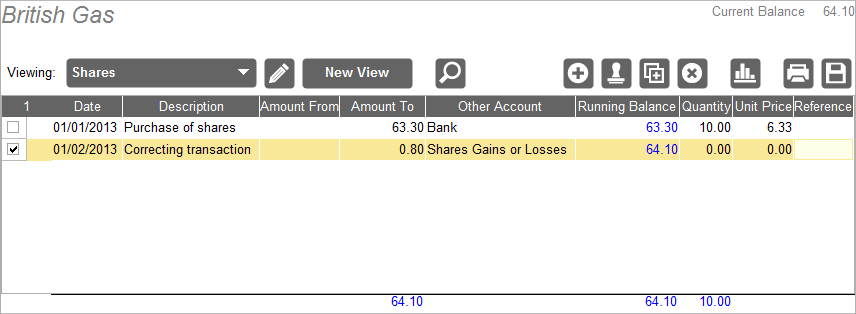
The next step is entering a transaction. We enter the transaction in the Transactions Tab for the British Gas account, using our ‘Shares’ view.

Accounting Software shares 12
Let’s say we’ve bought 10 shares of British Gas at a value of £6.33. The transaction should look like the screenshot above. Please note that the values at the bottom of the table represent your total share value (Running Balance), and the total number of shares owned (Quantity).
So, at regular intervals (say, once a month) we will want to adjust the value to represent our shares’ current total value. This is done by entering a correcting transaction.
Accounting Software shares 13
In this example we will imagine the shares have gone up to a price of 6.41. Therefore we (manually) need to calculate the shares’ total value, which is 10 (the number of shares owned) x 6.41 (the current price), and then subtract the previous running balance figure to give us our correcting transaction (i.e ((10x6.41)-63.30)=0.80).
As the price has gone up, this is entered in the ‘Amount To’ column. The ‘Other Account’ value is set to ‘Share Gains or Losses’. Please note, you will also need to set the ‘Quantity’ value to zero (as otherwise the Quantity total (at the bottom of the table), which represents the number of shares you own, will be incorrect).
Next, we will look at selling shares.
Accounting Software shares 14
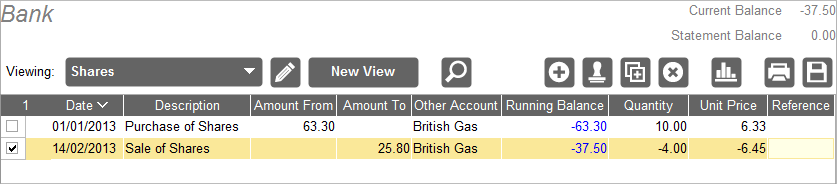
Let’s say, subsequently, that we sell 4 of our shares at a price of 6.45. The transaction needs to be entered in the format above. The total value of the transaction is entered in the ‘Amount From’ column, and the Quantity and Unit Price need to be entered as negative figures (to ensure our Running Balance/Quantity totals make sense).
Accounting Software shares 15
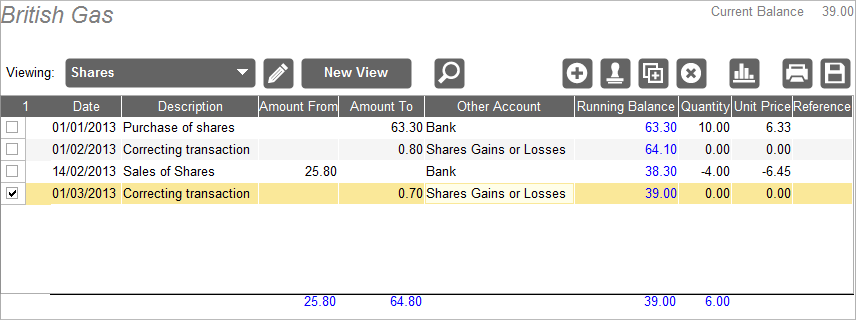
Our next correctional transaction at the start of the following month works in exactly the same way as previously. We multiply the total number of shares owned (now 6) by their value (let’s say this has gone up to 6.50), so 6x6.50=39.00. This is the total value of our share holding. Next we subtract our running balance (38.30), so the value to enter is 39.00-38.30= 0.70.
Create a Consolidated View
For the sake of clarity when reviewing your share data, it is a good idea to create a view which consolidates all the correcting entries into a single transaction (i.e. all correcting entries are represented as a single line in the table).
Accounting Software shares 17
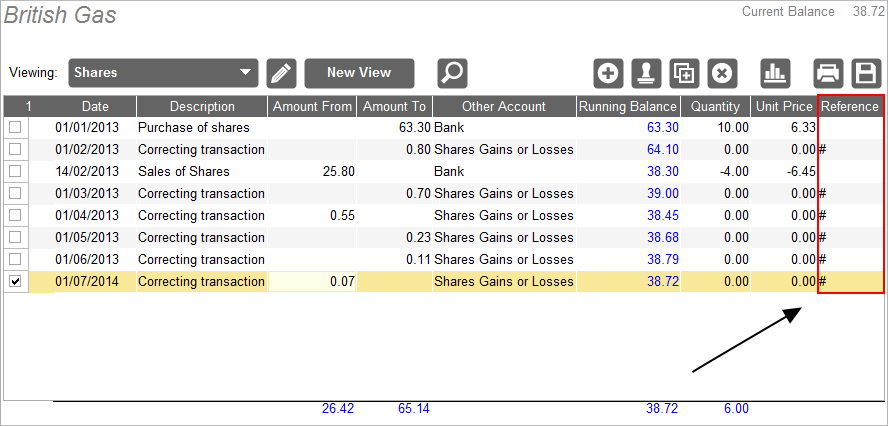
For this to work, for every correcting transaction created, you will need to make sure that the Reference field contains the same value each time (as the view we are about to create will be set up to consolidate all entries on the Reference field). In the graphic above, we have entered a hash sign (‘ ’) into the Reference field for transactions of this nature, but it can be any value (e.g. ‘shares’) so long as it is entered each time.

Accounting Software shares 18
Next, make sure our Shares view is selected, then click ‘New View’ to create a new view based on this one.
Accounting Software shares 19
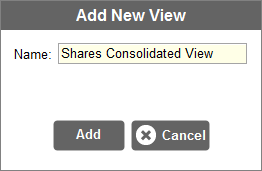
Next, name our new View ‘Shares Consolidated View’, or equivalent.
Accounting Software shares 20
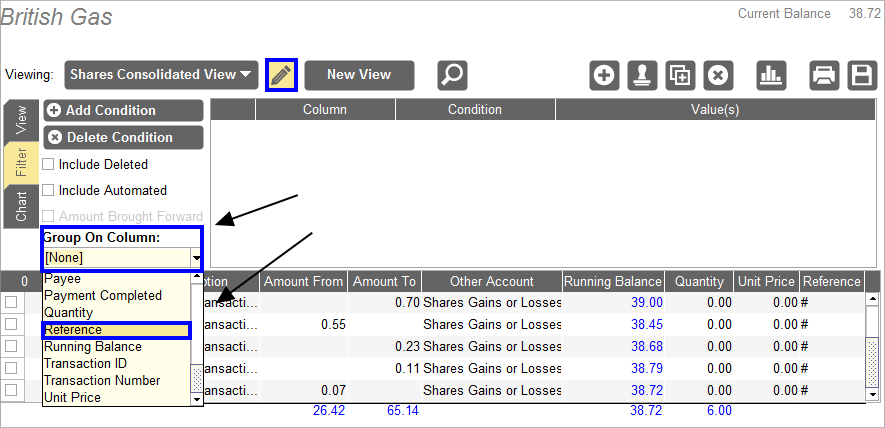
In the ensuing window, make sure that ‘Reference’ is selected as our value in the ‘Group On Column’ drop down menu, and then click the pencil icon to close the View Editor.
Accounting Software shares 21
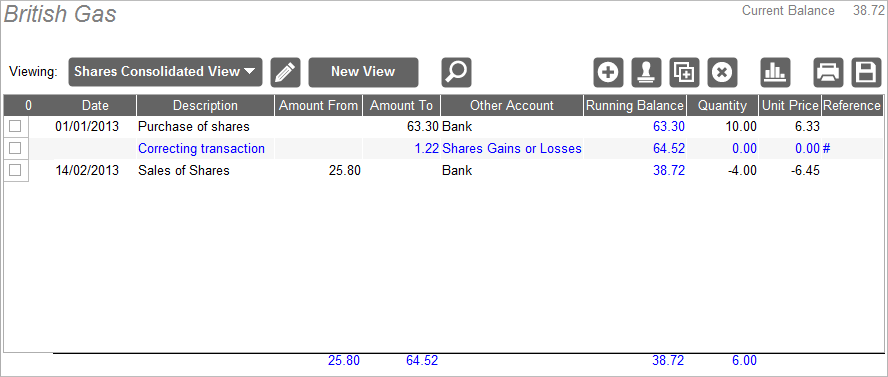
Here we can see that our correcting transactions have been combined into a single transaction line, leaving our Running Balance and Quantity totals correct.
Reviewing our Data
Accounting Software shares 16
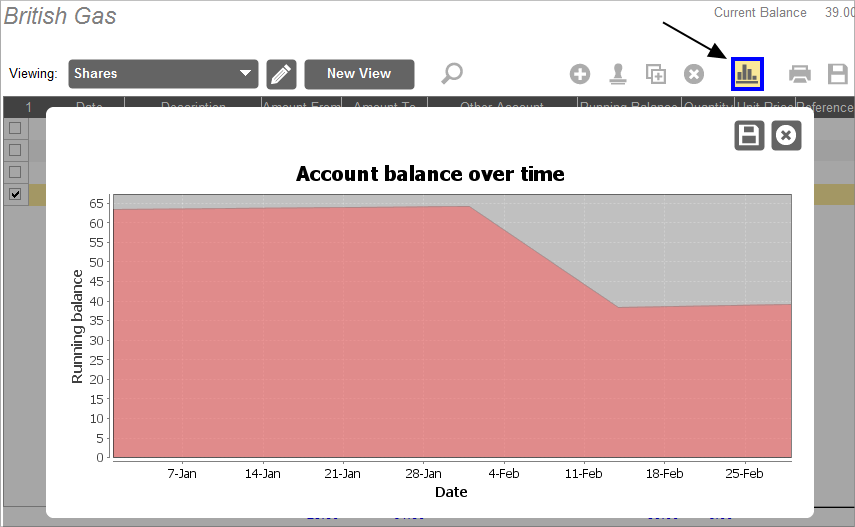
If we wish to further review our data, clicking on the ‘Chart’ icon in the table toolbar displays a chart showing the total value of our share holding over time.