Import - Map your old account structure to the new account structure
Introduction

Accounting Software import map account structure
Home Accountz has its own default account structure that you can customise.
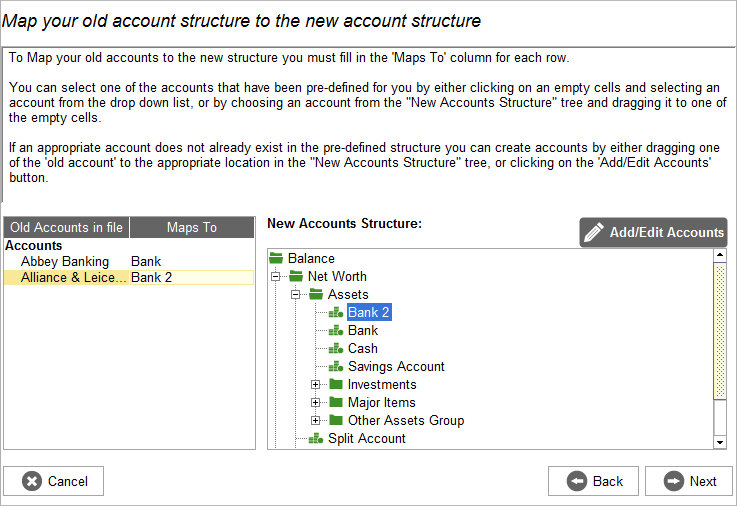
In this screen you need to assign a system defined account (shown in the New Accounts Structure tree on the right of the screen) to each of the account names found in your exported data file(s) (shown in the Old Accounts in file column on the left of the screen).
This screen also allows you to create, delete, and rename system defined accounts as well as modify the structure of the system’s account tree.
The screen is comprised of:
- A Mapping Table on the left of the screen where you assign a system account to an account name found in your exported data file(s).
- The New Accounts Structure tree that shows you the current Home Accountz account tree structure.
Mapping Table
The ‘Mapping table’ on the left of the screen is made up of two columns:
- Old Accounts in file - this column contains all the Accounts and Categories that were present in your exported data file(s). The Categories are indented to match their structure as found in your legacy application.
- Maps To - this column contains a series of account selection boxes where you can select the appropriate Home Accountz account that corresponds to the legacy account name found in the export file.
You can create new accounts to use as mappings in your Home Accountz file by dragging a row from the Mapping Table and dropping it in the New Accounts Structure tree at the desired position in the account tree structure.
New Accounts Structure
This tree shows you the current account structure in your Home Accountz file.
If you select a row in the Mapping Table that has already been mapped the tree will automatically select the same account to show you where it is in the account tree structure.
You can click and drag an account from the tree and drop it on to one of the account selection boxes in the Mapping Table to set that account as the mapping for that particular row.
You can also edit all aspects of the account tree structure by clicking on the Add/Edit Accounts button located at the top of the tree which will open the Accounts Manager dialogue.
Click the next button when finished.
